About this Blog: Bread making recipes, knit and crochet projects, wood working, gardening, digital imaging, travel, cruise ships, Labrador Retrievers, and more....

About the Header Image: Idlebrook Wendy Darling Evensen "Wendy" one of our four Labrador Retrievers.

Click the header image to see most current posts.

Sunday, February 28, 2010

Casino Royale


Good morning,

If you've been on a cruise, you've seen those great ship casinos with all the noise and lights flashing.  Clinking and clanging, beeps and boops of the slots can be heard from afar and seem to draw people toward them.  Perhaps you stopped in to the casino and contributed to the one-armed bandits.  Well, some of them don't have arms any more, you only have to push buttons to make your contribution.


There are tables near those slot machines, too.


Where you can make your contributions with others instead of all alone at a slot machine.  :)


There are other casino games you can play, too.


Or, you can just enjoy a drink at the casino bar.
 
The Casino is fun place to enjoy on a cruise.  There are penny slots now, so you can have a grand time for hours with just a few dollars.  Of course, you can bet much larger amounts, too.

Hopefully, if you have stopped in the casino, Lady Luck was good to you. Even if you don't gamble, it's entertaining to just go watch the action.

These images were taken aboard Royal Caribbean's Majesty of the Seas with my Canon 50D.

Enjoy,

Lois

Click here for more articles about Cruise Ships.

~~~~~~~~~~~~~~~~~~~~~~~~~~~~~~~~~~
~~~~~~~~~~~~~~~~~~~~~~~~~~~~~~~~~~

Saturday, February 27, 2010

Short Jacket for 18" Doll - Knit


Clothing for 18" Dolls is available for purchase at 


Knit and crochet patterns to make clothing for 18" Doll are also available.


~~~~~~~~~~~~~~~~~~~~~~~~~~~~
~~~~~~~~~~~~~~~~~~~~~~~~~~~~

Friday, February 26, 2010

Twin Rainbows at Sea


Good morning,

One misty morning after a gentle rain I went out to breathe in the fresh sea air and take a walk along the deck of Royal Caribbean's Majesty of the Seas.  

The ship was gently rocking as I rounded the bow and was greeted by these beautiful twin rainbows. 

A gentleman was standing at the rail admiring the sight.  I stopped to capture this image when, with a heavy Spanish accent he quietly said to me, "Isn't it beautiful?  Twin rainbows are good luck."

Yes, it is beautiful and I feel lucky to be alive and where I can appreciate and enjoy such glorious sights.

This image was taken with my handy, pocket size Canon Powershot.

Very best,

Lois

~~~~~~~~~~~~~~~~~~~~~~~~~~~~~~~~~~~~~~~~
~~~~~~~~~~~~~~~~~~~~~~~~~~~~~~~~~~~~~~~~


Thursday, February 25, 2010

Button Monsters - Crochet

Good morning,

Here's a fun little project to do with the kids on a snow or any other day you can spend quality time with them.

You can help teach new crocheters to make this quick project, or if they aren't ready to make the monster itself, they'll be delighted to help with the eyes and to wear the finished product.

These Button Monsters are NOT for children under three years of age.

Have fun with these!

Lois

-----------------

Button Monsters - Crochet

Materials: H crochet hook, #4 yarn, small google eyes, hot glue or craft glue that dries clear to attach eyes.

Ch 4, join with ss.

Working over yarn end: ch 1, sc in ring. This is the front of your monster. *ch 4, sc in second st from hook and in next 2 st, sc in ring. Repeat 3 more times from *. Arms and legs made.

Continue working in original ch 4 circle to make head.

Ch 2, sc in ring, turn and work from back, 4 sc in ch 2 just made, join with ss in first st of round.

Break off.

Pull end to back and weave under making sure center is not covered so that you can button your monster on your shirt.

 Attach eyes with craft glue that dries clear or with hot glue.

These are addictive.  How many did you make?  :-)

Have fun,

Lois

~~~~~~~~~~~~~~~~~~~~~~~~~~~~~~~~
~~~~~~~~~~~~~~~~~~~~~~~~~~~~~~~~

Wednesday, February 24, 2010

Key West Wind Chimes

 
Good morning,

Here are more wind chimes for sale in Key West, Florida.  If I had an appropriate space to display them at home, I would collect wind chimes.  Perhaps that will be part of the new decor for our recreation room some day.

The colorful chimes at the right were found in a shop along the back side of the shops facing Key West's Historic Dockside.

These images were taken with my Canon 50 D.

I found some gorgeous wind chimes on Duval Street in Key West in December, too.

Enjoy,

Lois
~~~~~~~~~~~~~~~~~~~~~~~~~~~~~
~~~~~~~~~~~~~~~~~~~~~~~~~~~~~


Tuesday, February 23, 2010

Pants for 18" Doll - Crochet


Clothing for 18" Dolls is available for purchase at 


Knit and crochet patterns to make clothing for 18" Doll are also available.

Monday, February 22, 2010

Cowl Scarf - Knit

Good morning,

A cowl scarf is extremely useful if you lead a busy life style. It's a hat and scarf in one, doesn't slip off, and is very handy for walking dogs when you bend over often and want to keep your scarf around your neck. I made the one in the picture for my daughter, Catherine. In the image above, the scarf is rolled.  Below you can see other views.

This is a very easy pattern. The yarn I used contains mohair and alpaca which is super soft and drapes nicely when made with such large needles. It is so very comfy to wear.

Stay warm!

Lois
------------------------

Cowl Scarf - Knit

Materials: Size 15 circular knitting needles; Size 6 super bulky yarn.

I used Bernat Galaxy, 1.75 oz, 50 gr, color Mercury for this project. 4 skeins.

Gauge: 9 st x 12 rows = 4"

Size: Adult. To measure for a child, measure from forehead back and over top of head and to back of neck for length; measure around edges of shoulders for diameter.

Finished size: 44" in diameter, 18" in length.

Cast on 100 stitches.

Join being careful not to twist and knit in round for 20 inches (flat). 

Cowl will naturally roll slightly at beginning and end.

Bind off.

The images show different ways the scarf can be rolled and folded.  It can also be pulled up from the back of the neck as a hood.


Patterns for other scarves and hats I have published can be found here.

Comments?  Just click the comment link below.

~~~~~~~~~~~~~~~~~~~~~~~~~~~~~~
~~~~~~~~~~~~~~~~~~~~~~~~~~~~~~

Sunday, February 21, 2010

Skirt for 18" Doll - Crochet

Clothing for 18" Dolls is available for purchase at 


Knit and crochet patterns to make clothing for 18" Doll are also available.

~~~~~~~~~~~~~~~~~~~~~~~~~~~~~~~
~~~~~~~~~~~~~~~~~~~~~~~~~~~~~~~

Saturday, February 20, 2010

How to Change a Light Bulb - Majesty of the Seas


Good morning,

If you've ever traveled on a modern cruise ship, you have surely seen the beautiful decor.  The lights in the image above are in the Centrum of Royal Caribbean's Majesty of the Seas.  What you don't see in the image that these lights are above Deck 7 and shine all the way down through Decks 6, 5, and 4 to Deck 3 of this gorgeous ship.

Of course, you have wondered how those light bulbs are changed, haven't you?  OK, maybe you haven't.  But, on a port day when I stayed on board, I got pictures of the answer to that question:


Here is the maintenance "bridge" that is suspended from the ceiling and extended across the Centrum  and over the brass rails of the balconies.  


Then, it all becomes quite simple:  just reach up, unscrew the light bulb....  :)


How many of these brave men are needed for this project? I counted five including those who helped place the bridge and stood by for safety as the bulbs were changed.


Here is the view from one deck below the action.  And, there are three more decks below me.

So, if you're ever on a cruise ship and someone asks, "I wonder how they change those light bulbs," you know the answer.

These images were taken with my Canon 50D.  The outdoor and indoor lighting and distances were handled so beautifully with this camera.

Enjoy,
Lois

~~~~~~~~~~~~~~~~~~~~~~~~~~~~~~~~~~~~~~
~~~~~~~~~~~~~~~~~~~~~~~~~~~~~~~~~~~~~~


Friday, February 19, 2010

Little Pocket - Crochet


Good morning,

I enjoy a small project or two between bigger crochet and knit projects. My box of orphan balls of yarn always calls out to me with a new project idea. As mentioned when I published the basic pattern for a little crochet pouch, I love containers. I like to make containers for just about any purpose and here is the basic pattern for another one in my series of pockets, pouches, and purses.

These little "pockets" are great to keep a few tissues fresh in your purse, a place to keep all of those discount cards separate from your credit cards in your wallet.... Make your pouch a little taller and you have a glasses case, digital camera, or cell phone holder. Play around with a few fancy stitches and you've experimented with new stitches while making something truly unique. Add a strap and you have a little purse for a little girl (see image);  add a key holder clip and you can clip it to your purse or belt loop (pattern coming later for this.)

Make the whole project bigger and you have a purse for yourself. These sell well at craft fairs, make little gift pockets, party favors, or a little something personally crafted to give with a birthday card.

Enjoy,

Lois

-------------------

Pocket


Materials:
J hook
A small amount of #4 yarn
One 3/8" button.

Notes: This easy little project is great for experimentation as seen in the images. As long as your stitches are snug, you can change the yarn, hook, and number of stitches to make your project truly your own. If you are an experienced crocheter, this is also a good project to teach to a new crocheter.

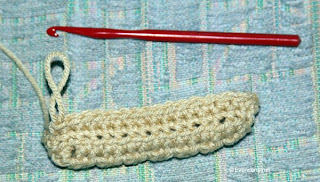
Start at bottom:

Chain 5


Row 1: sc in second chain from hook and in next three chains (4 sc), ch 1 turn

Rows 2 - 14: sc in each st (4 sc).

Do not break off.


Sides:

First round of sides: ch 1, turn, 2 sc in first sc, sc in next 2 st, 2 sc in last sc. now working along side of bottom, sc in end of each row to next corner, 2 sc in corner, 1 sc in each of next 2 st on end, 2 sc in next corner, sc along other side of bottom, do not join, do not chain 1.

Second round of sides: Working in back loop only, sc in each st around (no increases in corners)

Third and subsequent rounds of side: working in both loops, sc in each st for 2.5 inches or height of sides desired.


Flap:

Row 1: At end of last long side, just before corner, ch 1, turn, sc in next 14 st, ch 1, turn.

Rows 2 - 6 : sc in each st, ch 1 turn.

Row 7: sc first 2 st together (dec made) sc across row, sc last 2 st together (12 st.). ch 1, turn.

Row 8: sc first 2 st together, sc in next 3 st, ch 2, skip 2 st, (button hole made) sc in next 3 st, sc last 2 st together. (10 st.) ch 1 turn.

Row 9: sc first 2 st together, sc in next 2 st, 2 sc in chain space, sc in next 2 st, sc last 2 st together. (8 st) ch 1, turn

Row 10: sc first 2 st together, sc in next 4 st, sc last 2 st together, (6 st) break off.

Weave in ends.

Sew button below button hole.

Did you try this one? Please click "comment" below and tell me about it. Comments are always welcome.

---------------------------------

Here is the basic pattern for pouches in my series of pockets, pouches, and purses as seen in the image below:


~~~~~~~~~~~~~~~~~~~~~~~~~~~~~~~~
~~~~~~~~~~~~~~~~~~~~~~~~~~~~~~~~

Thursday, February 18, 2010

Sailing Off Into the Sunset


Good morning,

The title says it all for this image that was taken aboard Royal Caribbean's Majesty of the Seas in the Florida Straits.

The image was taken with my "baby camera," a Canon Powershot SD 750.

Enjoy,
Lois

~~~~~~~~~~~~~~~~~~~~~~~~~~~~~~~~~
~~~~~~~~~~~~~~~~~~~~~~~~~~~~~~~~~


Wednesday, February 17, 2010

Erik and Penny at the Dog Park

Good morning,

This is a darling image sent to me by my daughter, Catherine.  Catherine takes Erik and Penny to the dog park at least twice a week in addition to taking them to dog school classes and agility trials at other times. 

Both Erik and Penny just love having this "play" and "work" time.  And, we just love having them as our special family members.

I don't remember who it was who said, "if you want a truly loyal friend, get a dog." Our family is fortunate to have two such truly loyal friends.

Best,
Lois

~~~~~~~~~~~~~~~~~~~~~~~~~~~~~~~~~~~
~~~~~~~~~~~~~~~~~~~~~~~~~~~~~~~~~~~

Tuesday, February 16, 2010

Norwegian Cranberry Almond Bread - Recipe


Good morning,

Here is a recipe for Norwegian Cranberry Almond Bread.  This takes a little time to make, but is worth it.

Comments and questions are always welcome.

Lois

-----------------------

Norwegian Cranberry Almond Bread - Recipe

2 eggs
2 T vegetable oil
1 T salt
1/4 cup brown sugar
1/4 cup cottage cheese
6 oz warm (not hot) water
3-1/2 cups bread (or all purpose, but not self rising) flour
2 rounded T yeast
1T cardamom (this is the ingredient that makes it "Norwegian" cranberry almond bread)
1/2 cup dried cranberries
about a quarter pound of sliced walnuts

Place everything except the last 2 items in a large capacity bread machine in the order given. Set to bread dough and turn on. The dough cycle on most machines is about 40 minutes. When all but five minutes remain, add the cranberries.
This is how it looks as it begins to mix and knead.
 A smooth slightly sticky ball should form about 1/3 of the way through the bread dough knead cycle.  If not, add a little flour or water.
 When finished kneading, place dough in greased bowl and allow to rise. I place mine in an oven with the light, but no heat turned on. Or, you can cover with a wet cloth and place in a warm spot.
 
While the dough is rising (this batch took 1-1/2 hours) place sliced almonds on a plate or in a container where you can gently press each small round loaf into the almonds.  Grease or spray the containers you will use for baking.  I am using small baking dishes to make small loaves to give as gifts.  This recipe will make two loaves in large loaf pans.
The dough has more than doubled in size so it is time to take it out and shape into round loaves. 
 Press each loaf into the almonds on one side and place in the greased baking dish with the almond side up. 
 
Don't turn the oven on yet, but place the loaves into the oven to rise a second time.  This batch required about 50 minutes for the second rise.
 
Ah, ready to bake!  Remove the loaves while you preheat the oven to 350 F.  I have different size baking dishes here so I set the timer to 30 minutes, removed the two smaller dishes, then set the timer for an additional 10 minutes to finish baking the larger loaves.  If you are using two large loaf pans, bake at 350 F for 45 minutes.After baking, turn out immediately to racks to cool.
 
And, here you have it!  Serve warm with any berry jam, cream cheese, Norwegian brown cheese, or butter.  Ja!
~~~~~~~~~~~~~~~~~~~~~~~~~~~
~~~~~~~~~~~~~~~~~~~~~~~~~~~